Hint 1
Study the picture carefully and place the stickers one by one as you confirm their location.
Start with the heart and the club. You should be able to work out the placement of those two stickers just by looking at the leftmost cube.
The mallet shown below is composed of seven identical cubes built on the same model, with a different sticker on every side. Unfortunately, one of the cubes is cracked and you need to make a new one to replace it.
With picture 1 as a guide, use the stylus to move, rotate and place the stickers on the replacement cube labelled 2.
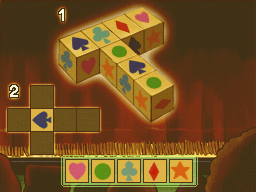
Study the picture carefully and place the stickers one by one as you confirm their location.
Start with the heart and the club. You should be able to work out the placement of those two stickers just by looking at the leftmost cube.
After placing the heart and club in their proper locations, try working out where the star goes. One of the cubes in the picture should have both a heart and a star visible. Do you see it?
Continuing from Hint 2, let's place the diamond.
Two diamonds are visible in the drawing. One is displayed on a cube where you can also see a spade. The other is on a cube which also has a star visible.
Use both of these cubes to pinpoint the placement and orientation of the diamond sticker.
Continuing from Hint 3, the last sticker to place is the circle.
If you've placed all the other stickers, it should be a simple matter of filling the last open space. If, however, you're still unsure about some of the stickers, look for the cubes displaying both a star and a circle and use the star as a reference point. The circle is next to the star in the picture, so they must share a border.
That's right!
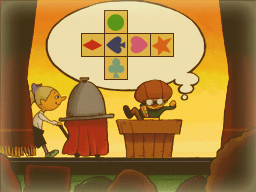
The stickers should be placed on the cube as shown above. With all the cubes stuck together again, this mallet is ready for action!
Hints you open and puzzles you mark solved are kept in this browser.